A question I am often asked is whether it’s possible to paint formica cabinets. I got such a call from a lady one day who admitted that she would actually prefer to rip hers out and replace them but she was on a limited budget and there were so many other things in her house that needed doing. She said she had no clue where to start and was terrified of opening a can of worms.
I do love a challenge and being that she didn’t live too far from my house I offered to stop by. A quick look would tell me whether the old cabinets were worth painting and, if not, we could talk about other options.
I could tell right away that it was going to take more than a coat of paint to rescue them. There wasn’t much character to enhance and the rounded ends were a dated giveaway. Plus, there were so many of them!
Stepping into her kitchen I realized that it wasn’t just the cabinets that needed to be replaced. The ceramic floor tiles, which ran through to the entrance hallway, and the flooring in the adjacent dining and sitting rooms all needed to go.
When I first spoke with the homeowner, she told me that she was badly in need of an interior designer but she thought that she couldn’t afford one. I asked her what she was willing to spend and whether she would be willing to work with me if I could get her new kitchen cabinets, stone countertops and new flooring whilst keeping to her budget. I also assured her that if I were to manage the entire project for her everything would happen in a timely fashion. I explained that I would charge an up-front fee, much of which would be covered by the professional discounts I could secure, and that I was pretty sure I could do all of this within her budget.


Once she felt ready to move forward, I asked her to send me some pictures of her dream kitchen and this is what she sent me.

Her house was on a horse property, so she was looking for a farmhouse kitchen. Given the eclectic nature of the style, I knew that I would be able to pull the scheme together for her without breaking the bank.
The first step in this project was to get an estimate in for flooring because it had to run through the entire downstairs area and would eat up a big chunk of the budget. I suggested a floating, vinyl plank floor—which is what I have in my own house—because I knew it was durable and has a very convincing, natural wood look. My floor has been down for eight years and it still looks as good as the day it was installed.
Once we had the numbers on the flooring, I got estimates on cabinets, countertops and the extra custom carpentry I had in mind for the project. I added in the cost of electric and plumbing work paid on a similar job I had done recently and found that I was right inside the budget, so the customer gave me the go ahead.
Now that we had our quotes, the first order of business was to take a shopping trip to select flooring, cabinetry and countertops so they could be ordered and the schedule could be set. Then it was down to me to get creative and pull the scheme together.


Doors 1
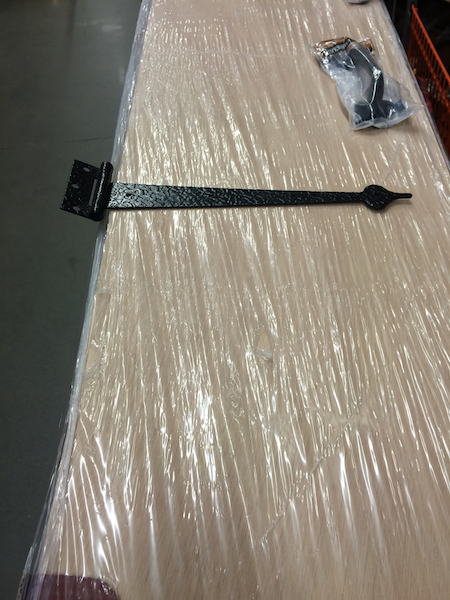
Plain slab doors and hardware purchased from Home Depot
Doors 2
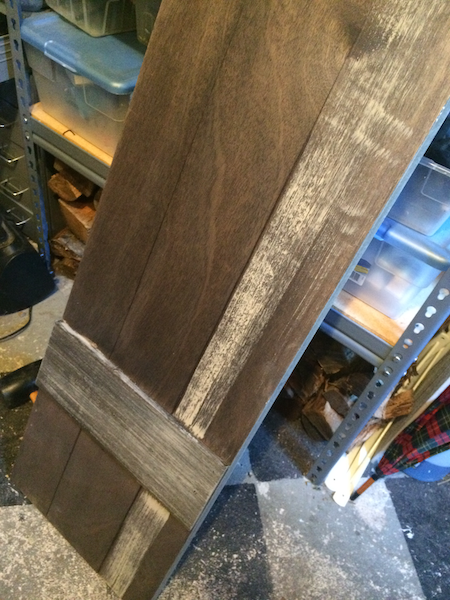
Horizontal boards glued to slabs which were then stained, marked up and dry brushed
Doors 3
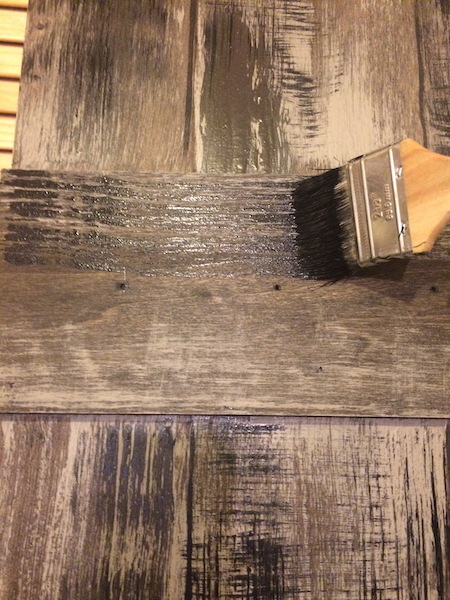
Dry brushing
Doors 4
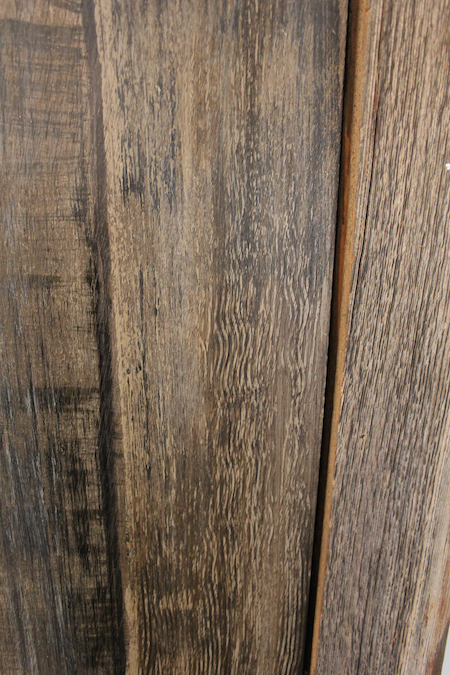
Light glaze applied and combed through to perfectly replicate real barn board to right
Doors 5
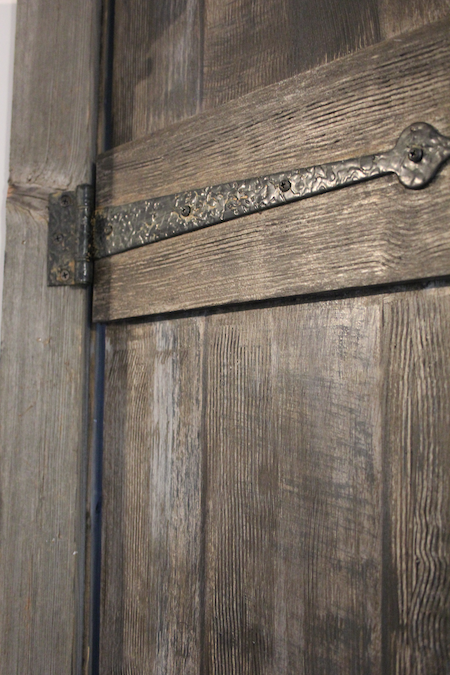
Faux rusted hardware connects finished slab to real barn board frame on left
Doors 6
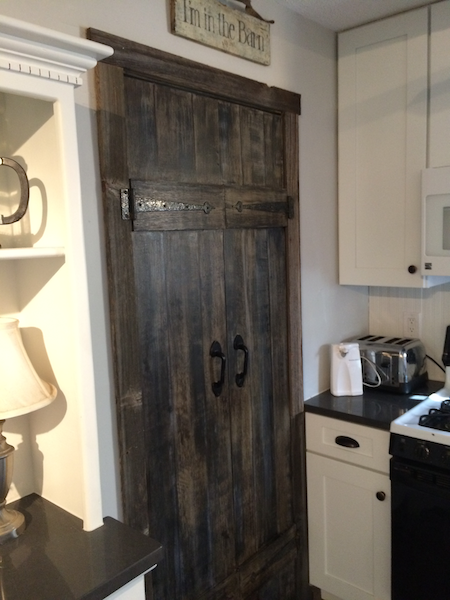
Finished doors


A question I am often asked is whether it’s possible to paint formica cabinets. I got such a call from a lady one day who admitted that she would actually prefer to rip hers out and replace them, but she was on a limited budget and there were so many other things in her house that needed doing. She said she wouldn’t know where to start and was terrified of opening a can of worms.
I do love a challenge and being that she didn’t live too far from my house, I offered to stop by. A quick look would tell me whether the old cabinets were worth painting and if not we could talk about other options.
After looking at her kitchen, I realized that it wasn’t just the cabinets that needed to be replaced. The ceramic floor tiles, which ran through to the entrance hallway, and the flooring in the adjacent dining and sitting rooms all needed to go.
When I first spoke with the homeowner, she told me that she was badly in need of an interior designer but she thought that she couldn’t afford one. I asked her what she would be willing to spend and whether she would be willing to work with me if I could get her new kitchen cabinets, stone countertops and new flooring whilst keeping to her budget. I also assured her that if I were to manage the entire project for her everything would happen in a timely fashion and come in on budget. I explained that I would charge an up-front fee, much of which would be covered by the professional discounts I could secure, and that I was pretty sure I could do all of this within her budget.
Once she felt ready to move forward, I asked her to send me some pictures of her dream kitchen and this is what she sent me.
Her house was on a horse property, so she was looking for a farmhouse kitchen. Given the eclectic nature of the style, I knew that I would be able to pull the scheme together for her without breaking the bank.
The first step in this project was to get an estimate in for flooring because it had to run through the entire downstairs area and would eat up a big chunk of the budget. I suggested a floating, vinyl plank floor—which is what I have in my own house—because I knew it was durable and has a very convincing, natural wood look. My floor has been down for eight years and it still looks as good as the day it was installed.
Once we had the numbers on the flooring, I got estimates on cabinets, countertops and the extra custom carpentry I had in mind for the project. I added in the cost of electric and plumbing work paid on a similar job I had done recently and found that I was right inside the budget, so the customer gave me the go ahead.
Now that we had our quotes, the first order of business was to take a shopping trip to select flooring, cabinetry and countertops so they could be ordered and the schedule could be set. Then it was down to me to get creative and pull the scheme together.
Doors 1
Plain slab doors and hardware purchased from Home Depot
Doors 3
Dry brushing
Doors 2
Horizontal boards glued to slabs which were then stained, marked up and dry brushed
Doors 4
Light glaze applied and combed through to perfectly replicate real barn board to right
Doors 5
Faux rusted hardware connects finished slab to real barn board frame on left
Doors 6
Finished doors